Invite Links make it easy to provide specific camera access to users and manage their default settings. Users will be able to register themselves and access the camera specified by using a shareable URL.
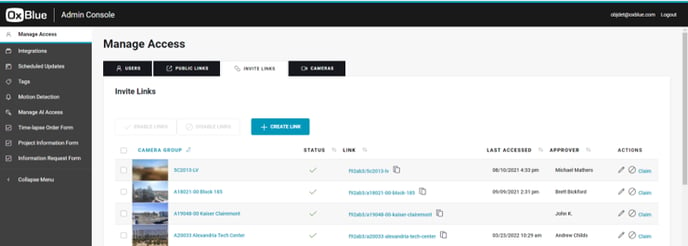
Clicking Invite Links in the Manage Access tab of the admin console will pull up a list of cameras with active invite links. This means anyone with a link can become a user.
To disable an existing link, click the camera group, then click Disable Link.
To disable an existing link and create a new one in its place, click the camera group
and click Update Link.
To create a new link, click Create Link and fill in the fields on the Create Invite Link page.
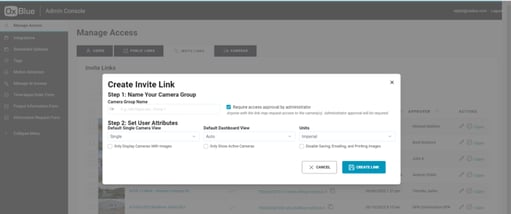
Step 1: Name Your Camera Group
- Enter the name of a camera group. Don't worry about needing one set in stone. You can edit it at any time from the main Invite Link screen.
- Check Require Access Approval by Administrator to restrict camera access to only those with permission.
- Select from the Default Single Camera View from the dropdown menu. If you choose Time-lapse, a link to a full project time-lapse will be created.
- Check Display Only Cameras with Images to prevent access to inactivated cameras.
- Select the Default Dashboard View from the Auto, Grid, Map or Enterprise options.
- If needed, check Show Only Active Cameras.
- Select the unit system used.
- If needed, check Disable Saving, Emailing and Printing Images
- Then click Create Link.
Once the process is complete, you'll be taken to the Invite Link page. From here, you can assign cameras to groups and create a shareable link.
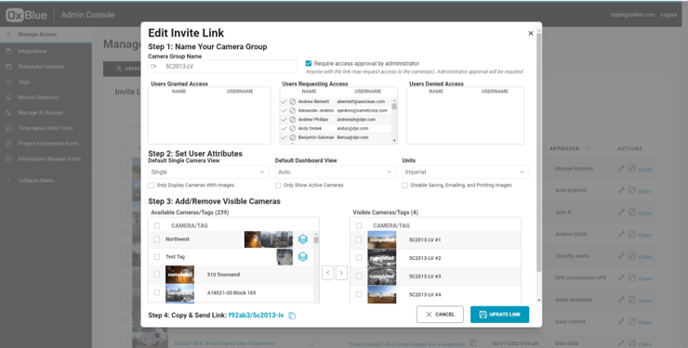
Step 3: Add/Remove Visible Cameras
- The available cameras that are not already assigned to the camera group are listed under Available Cameras/Tags, and you can move them to Visible Cameras/Tags using the arrows.
- Copy the link by clicking the copy icon and email it to the person to whom you want to provide access to the camera images.
- When you are done, click Update Link to return to the previous screen.